Friday, December 20, 2013

Tomato Pasta Sauce

Tomato Pasta Sauce
Posted by Cris

We love our fresh tomatos all summer, but then they all come at once so we blanch them (quick 10 secs in boiling water), peel the skins and core them and freeze them in bulk.

And then hunting season comes and I start cooking. Only this year Jon didn't go up nort' so he helped!

Ingredients
Tomatoes
Zucchini (or squash)
Onions 
Garlic
Basil
Salt and Pepper

I would love to give you exact amounts and all so you could replicate this, but that's not how I cook.  I had 4 big gallon ziploc bags of tomatoes, 6 cups of zucchini (measured pre-frozen) and 1 onion and LOTS of garlic  (10-14 cloves) basil and salt and pepper are to taste. 

Here are the steps - defrost (it took a good 24 hours for those tomatoes)

Chop and Saute the onion and garlic.


Enjoy the smells!   Put it all in the slow cooker to marinate. 

 Add the garlic and onions to the slow cooker. 

 Add BASIL (I love basil! check out pesto here!) I rescued this tiny plant from the garden and its now on my kitchen windowsill for fresh basil all year long.  I also have a lot of dried basil.  Both work great.  
  
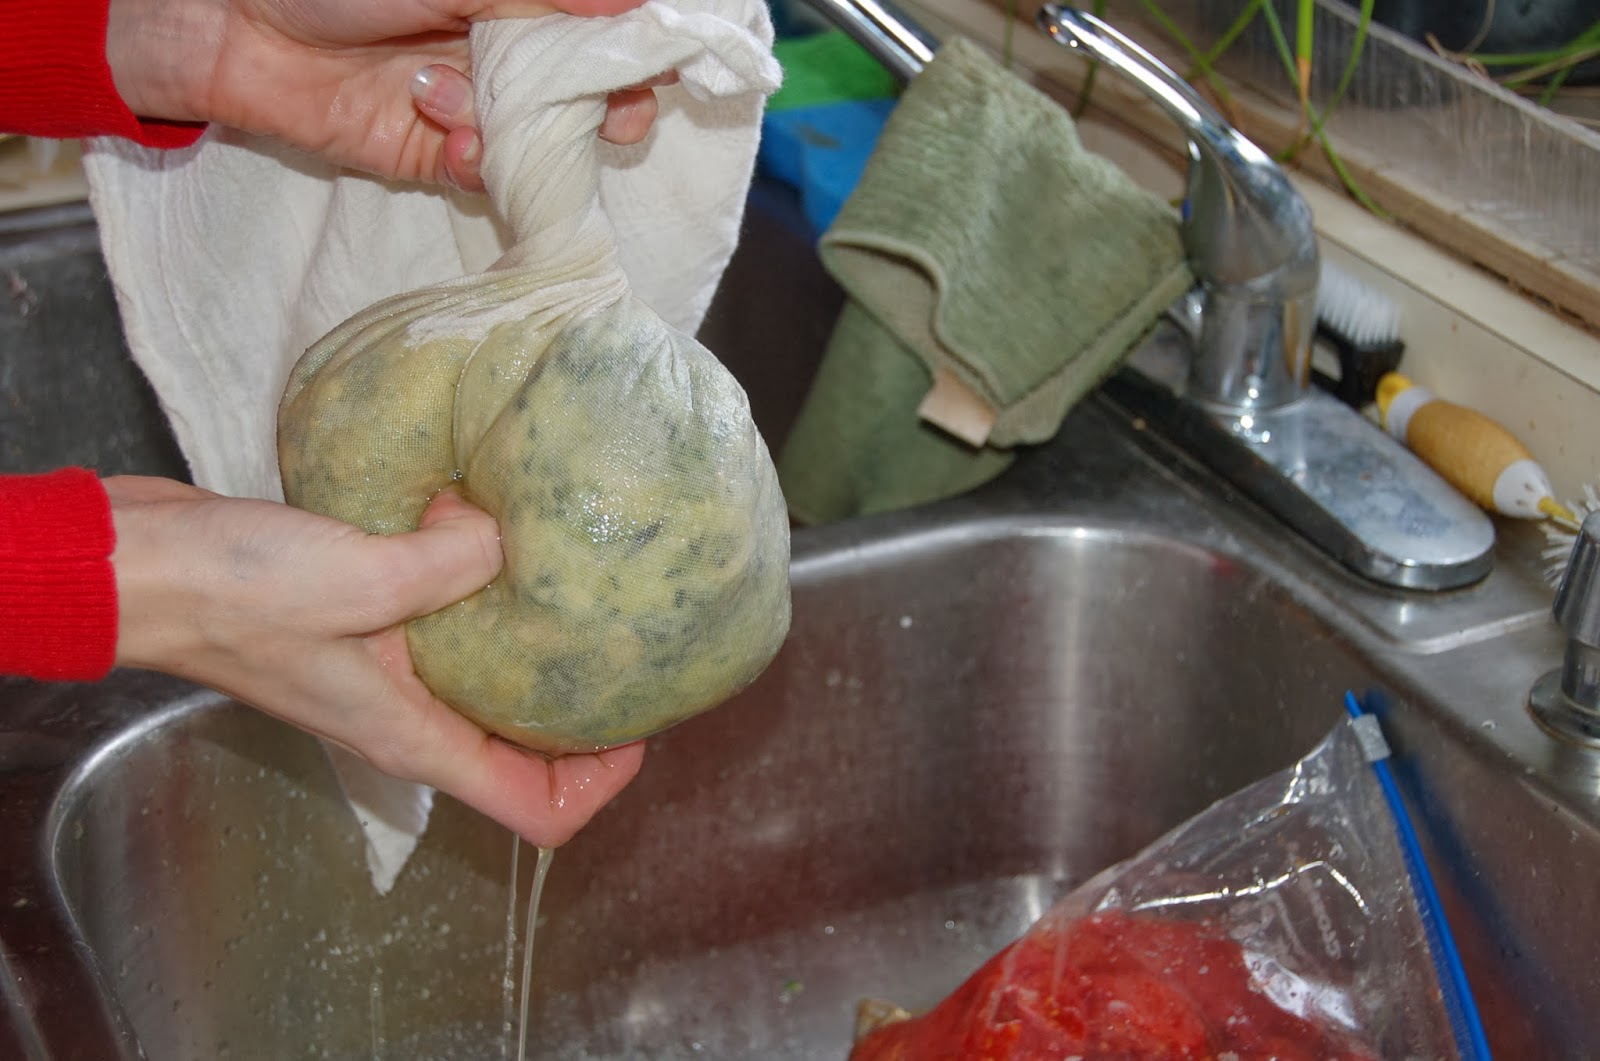
 Zucchini is not the most common ingredient in tomato sauce, but we always have a lot of excess that I shred and freeze in 2 cup portions.  *Why 2 cups? It's the right amount for zucchini muffins. The reason I add it is to thicken the sauce and add some extra vitamins and vegetables - what the kids (and hubs) don't know won't hurt them.   

So when it thaws there is a LOT of excess water. Since we are trying to thicken the sauce that needs drained off.  I put all of it into a cheese cloth.   


Wrap it up and strain.  It's really easy.


Okay - so that goes into the slow cooker too.  Mix it all up. Let it cook on low for 6-8 hours or high for 4 hours.  Taste it throughout and add salt and pepper.  If it tastes bitter, you can add carrots (shredded or cooked/mashed) to sweeten things up.  I had to do this last year, but this year it was fabulous without. 

When all done cooking its still very chunky.  We like our tomato sauce well pureed - so we put it in a blender and puree away. 

You can certainly eat this right away or store in the fridge for a few weeks.  

We went ahead and added to jars and started the canning process! 
You need to leave a 1/2 inch of head space. 


Its a water bath process - which I think is easier than pressure cooking, but whatever. 
They have to stay in there for 35 minutes.


And when it was all done we have 12 jars of beautiful homemade Tomato Pasta Sauce. 

PS - Also amazing as PIZZA sauce. 

Sunday, December 8, 2013

How to make Homemade Grape Jelly

Grape jelly is easy. You technically don't even have to have real grapes. You can use store bought grape juice, but then, what fun would that be?  As with any food which you process yourself, making jelly is not only simple, but very gratifying as well. The taste is sooooo much more flavorful when you remember the fact that it was YOUR spoon that stirred it, and it was YOUR hands that picked the grapes, from YOUR vines. A small amount of grapes will yield a LOT of jelly. Can you say Christmas presents? Who doesn't like homemade goods?

First is the obvious. You gotta pick the grapes. I know mine are ripe when the chickens begin wondering beyond their normal range giving the appearance of tiny trampolines beneath the vine, as they jump up trying to get the lower bunches.  I use small shears to detach the bunches, as pulling them off of the vine makes it bounce a lot and drop perfectly good grapes.

Don't they look scrumptious?

After picking the grapes off of the stems, I washed them and threw them all in a cook pot. Add about 1 3/4 cups of water for every 5 pounds of grapes. Mash them with a potato masher. DON'T use a juicer. As with raspberries and such, if you use a juicer, you will get a lot of bitterness from the seeds. They do not have to be crushed very well, the cooking process will bring out the flavor. 

bring the grapes to a boil and then reduce to a simmer for about ten minutes, stirring occasionally. In no time, your kitchen will be smelling like a Welch's factory.

Next, strain it to get rid of the hulls, pulp, and seeds. You wan't only juice if you are trying to make jelly. 


You will need 5 cups of grape juice for 1 batch of jelly. Pictured here is 3 batches worth of juice from our 1 dinky little grape vine.  If you don't quite have 5, relax, you can just add water to the juice. It will dilute it slightly, but providing it is less than 1 cup of water, I doubt you will know the difference.

Along with the 5 cups of grape juice, you will need 7 cups of sugar and 1 pack of Pectin (I use Sure-Jell). Pectin is found naturally in the peels of fruits, but I would suggest buying it if you want to get this jelly done THIS YEAR!.

Pour the juice into your cook pot and put some flammage to it. It needs to come to a boil, so Medium is good.

Pour in the pectin right away and stir it in.

While you are waiting for the juice/pectin to boil, fill your jars with hot water to help prevent breakage when you fill them with your yummy jelly.

Once the juice/pectin reaches a boil, pour in the sugar while stirring constantly. ALL 7 cups.

Keep stirring. You need to reach a full rolling boil for a full minute before turning off the burner.

Then pour the jelly into your jars.

Process the jars for 5 minutes in a water bath.

Let the jars cool for 24 hours and ENJOY!!!!! 

Saturday, November 30, 2013

Meat Rabbits

Well,  we were going to wait until spring for the a new addition to the homestead, but as luck would have it, I ran across a guy who was selling a bunch of his rabbits and hutches in a feeble attempt to reduce his daily chores. He had quite an operation going there. 
I didn't need the cages, as I had already been planning this project for a while. They have been set up in the garage for a little while now, just waiting for some inhabitants. 
Why eat rabbits?
Good question.
1) Their meat is extremely lean. (wild being even more lean than domestic). 
2) They are simple to raise and easy to process.
3) They breed like bunnies.........
A trio of rabbits can produce enough offspring to provide about 180 pounds of meat in a single year. Granted, this is achieved by immediately breeding the rabbits as soon as the mother gives birth, but this causes considerable stress  to the momma, and will shorten her life tremendously.
If you have followed our little homestead for any length of time, you would know that we would NEVER do this. We plan on waiting until the young are weened before we will consider breeding her again. That will be about approximately 6 weeks. 
Also, we are starting with only a pair, rather than a trio. We are hoping to get between 4 and 5 litters per year, which should yield about 60 pounds of meat. This first year will be a trial year to determine if we need to get another doe, or begin a massive rabbit breeding operation (just kidding cris).
Anyway, let's meet the new additions.

This is the buck (male). He is a Californian. Californians are the second most popular meat breed of rabbit. He is about 5 months old, which makes him "almost" ready to breed. He weighs in at about 4 1/2 to 5 pounds. This is actually the size of which rabbits are slaughtered. As long as he does his business with the lady friend, he will not have to worry about that any time soon.

This all white fluffy ball of joy is the doe (female). She is a New Zealand. New Zealands are the most popular breed of meat rabbit, as they have large litters, and are pretty hefty little buggars. They are by far not the largest breed, but due to the feed to meat ratio, they remain seated high above the rest on the list. 
This girl here was born in early spring of this year, making here about 9 months old. She is able to breed right now, but I am waiting a little bit longer before I introduce her to the buck. 
When I am ready to breed them, I will move the doe into the bucks cage. If I moved the buck instead, he would be less interested in the female and begin to spray her cage with urine to "mark his territory". The deed would just take longer thats all! By moving the doe, a five minute timer, and a little Barry Manilo should do the trick.
Unlike most animals, rabbits do not "come into heat". They are ALWAYS in heat, which means that as soon as they breed, she should have conceived. Once they breed, I'll mark the calendar, and hopefully in 28-30 days, there will be a nice little litter of babies. 
We SHALL SEE!!!!!!!

Tuesday, November 19, 2013

Pallet Goat Shed

Trying to keep costs to a minimum, we decided to utilize pallets to make our new goat shelter. With winter closing in fast, it became a mad dash trying to break apart enough pallets to finish walling up the north, east and west sides. The south side is half finished, just enough to keep the goats inside of the enclosure. I couldn't have gotten this far without the help of my good friend Jeremy once again. Together we broke up almost 400 pallets to salvage just the 4 runners from each. All of the slats were either burned while we worked, or stacked for future bonfires.  If I had to guess..timate how many man hours went into building this shelter, I would place it somewhere around the 60-70 hour range (most of which were prying and bashing the pallets). 
I designed the shelter with the pallets in mind. Knowing that the runners are mostly 40 inches (with a few at 36"), I spaced the 4x4 posts about 3 feet apart on centers so that all of the walls would only require small cuts on the runners to fit them in. Some runners only had to reach center to center, while others had to cross the entire end of the 4x4, or even cover the end of the other runners after the 4x4's (corners).  Lot's of measuring and cutting.
These are what the pallets we broke apart looked like. As you can see, each pallet has only the 4 verticle runners in the middle, holding the slats together. This was the "gold" we were digging out. As if it wasn't bad enough, having to work so hard for just a few runners, that sometimes 1 or 2 of the runners were actually bad and had to be burned with the slats because they were too warped, cracked, or rotted underneath a few slats. 

After salvaging the runners, the nails had to be pounded in (no way I was going to remove them all) prior to use. 

here is a small pile of the slats which we will burn at our next bonfire.

This was the very start of the project. Just 2 4x4's set about 2 feet deep in concrete.

As more 4x4's were placed and concreted in, the design slowly began to form.


Roof framing completed

sheeting and felt paper 


shingle time. I was going to use corrugated steel instead of shingles, but in the end, I elected to use shingles, as they more closely match the garage.

Roof is DONE.

At this point, putting up runners was all that was left to do (besides designing the inside stalls and hay storage)


feeding area is in the entryway to the shelter

this back stall actually has a small "doggy door" at the back left. In spring, I will be fencing in a small area within the current enclosure so that Smokey can be separated from the girls. This way, I can stagger the does kidding times to maximize our milk production.


and of course there is Goat Chicken. He has finally found a friend. A New hampshire red hen that was brought back to me by a friend because all of her other chickens were smoked by a fox. The hen, like Goat Chicken, doesn't really get along with the rest of the flock, so they both stay in the goat shed together. During the day, I have noticed them to be almost inseparable. 

Jersey just wanted to say Hello!

Ginger just wants to eat!

So that's it. Our new goat shelter. These dang goats better appreciate how G-o-o-d they have got it.