Wednesday, October 23, 2013

Homemade Dishwasher Detergent Cubes

Well, the homemade laundry detergent worked out so well that we decided to try making some homemade dishwasher detergent too. I researched a bit and found a simple way to not only make the detergent, but how to make little cubes. BONUS!!!
So before I go on with the process of making them, I have to say.  We did the first load with only the cube. Mistake!.  Every dish was left with a thin film of cloudiness. You need, need, need a rinse agent. For that, we just filled the little reservoir with white vinegar and the homemade detergent/rinse agent rocked every load after that with awesome results.
So here we go. 

What you will need:
-Baking Soda
-Borax
-Kosher Salt
-Vinegar
-Unsweetened Lemonade packets
-and some sort of molds for the cubes 
(Some people online used silicone candy molds, but many complained that they couldn't pack the cubes hard enough in those molds, so I elected ice cube trays.
This first batch I made was a half batch (To see if it even worked), but I will give the "full" batch measurements throughout this post. Feel free to cut in half for your first try. 

pour 2 cups of Borax into a mixing bowl


Then pour 2 cups of baking soda (the recipe I used said you can use "either" baking soda or washing soda", we used baking soda)


add 2 unsweetened lemonade packets. Mmmmm doesn't it smell Lemony Fresh!!!!

Add 1/2 cup of Kosher Salt

Mix all of the dry ingredients together well.

Pour in 1/2 cup of vinegar. There will be foaming (but not much)


Quickly stir the mixture together until it is evenly mixed.

Pack the trays to the desired depth, making sure to keep in mind how thick they can be to allow your dishwasher compartment to still close after placing the cube in.

Use your finger (or some other super tool) to Pack the mixture hard into the trays. 
Allow the cubes to dry for at least 24 hours. 

Now....a little trick, as I am a super impatient person. I placed a tray in the microwave to "speed up" the drying time. Just as I began to hear the mixture quietly sizzle, I stopped it and took the tray out. A few of the cubes had tiny bubbles arising from the edges, but they quickly subsided. After the cubes cooled, I tipped the tray over and they all came out hard little cubes. PERFECT! 
Of course I did the remaining trays the same way. 
The heat from the microwave seemed to fuse the mixture together very well.
Good luck...and don't forget the rinse agent ;)

Tuesday, October 22, 2013

Stove top gunk cleaner

Posted by Cris

So Jon does most of the canning and cooking now that he is home full time, but like most husbands he lacks in the cleaning department.  We all have our strengths, and areas in need of improvement.  
After a long canning season, our stove looked like this.


Thank goodness for small miracles - like Magic Eraser (seriously, I gave these as Christmas presents when they first came out years ago) They are ah--mazing!  They are a staple to have in your home.  In the kitchen and the bathroom. To help the magic eraser out, though, you can make a paste with baking soda and peroxide.  This takes some elbow grease so roll up your sleeves, you may want to wear gloves too. 


But look at the stove after - almost like new.. or at least not gross to look at.  Lets see how long the husband can keep it clean. Any bets?


Monday, October 21, 2013

Homemade Laundry Detergent

Posted by Cris

This took all of 15 minutes to make - and probably would have only taken me 5, but the kids wanted to help.  And well, I encourage them helping!
So this recipe is all over. My sister was the one who first introduced me to this, then my college roommate posted it to my FB page, and many others have "pinned" this to me as well.  Thanks - I got the hint.


First you have to grate the bar of Fels Naptha. 

It smells great, and the kids like using the cheese grater.

Mason measured 1 cup of Borax into our storage container.

Mason measured 1 cup of Washing Soda into the food processor. Then they dumped in the grated Fels Naptha soap.  


Look at how nice they can work together!  They even said they had FUN!


Grind it up and dump in the container with the Borax and stir.  To use - dump 1-2 level Tablespoons right on top of the clothes.  This is a VERY concentrated mix. I only use 1 TBSP, but then I have the smallest washer (apartment sized) known to man.  

We think it works great.  It only costs about 5 cents per load of laundry.  As a super couponer, I can sometimes find deals on liquid for 10 cents/load, but not all the time.  And I'm hoping that this will help with Mason's sensitive skin. Its also supposed to be great for the septic system since there are no harsh chemicals.  Saving the planet and some money!  Woohoo!

Thursday, October 17, 2013

Accidental Apple Glaze

Yes ACCIDENTAL.....
Some of the best things in life are accidents (No, i'm not talking about the kids....Both planned).  My mother decided she wanted to make apple jelly yesterday. So of course I was up for it. She even supplied the apples. BONUS!!!!
The trick was this.  SPLENDA. Being a diabetic, my mother cannot bask in the glory of sugar like we do. I couldn't imagine not being able to down a sugar packet at the restaurant just because.
Needless to say, I quickly scanned the Sure-Jell recipes to check if this was OK.
Yadda yadda yadda....."reducing sugar"...blah blah..(yes this is how I read....It's called SKIMMING, most guys do it)...."sugar substitutes"....blah yadda blah....
OK,  score.....This will work just fine. 
So mom gets here, we bust out the jelly, only to find out that it will NOT SET. In fact, it is the consistency of thick maple syrup.
Back to the recipe.  Only this time, I read in slightly greater detail (like EVERY word)
Apparently the "blah blah yadda" parts were important. It said "reducing sugar or using sugar substitutes will result in SET FAILURES"
OOOOoops!!!!
Hence, we have an AMAZING apple glaze. We even tried it on pork chops last night for dinner. heavenly

So here it is. The process for "Screwing up"

Pick your apples. They don't need to be perfect since we are just going to juice them.


Quarter the apples. You can leave the seeds in them, but I would recommend removing the stems and any bad spots.

cook the apples in a COVERED pot with 1 cup of water per heaping quart of quartered apples. They need to be cooked until they are soft all of the way through.

Extracting the juice can be done in different ways, but I prefer to recycle old T-shirts to strain the fruit. You can twist the shirt tightly without tearing the fabric, and in turn, this requires less squeezing with your hand.
Wear a good glove if you are impatient like us, otherwise you will burn your hand badly. The glove I am using here is not a "cleaning" glove, it is a specially insulted glove made for handling hot foods. 
Might I recommend waiting for the apples to cool.

On the stovetop:
Put 7 cups of apple juice into a pot and add 9 cups of Splenda, stirring constantly. The burner should be set to Medium.

Now add the Pectin. This will help the mixture gel slightly and prevent it from having the consistency of water.


Continue mixing slowly until you have reached a rolling boil. (This is where the mixture boils even while you stir it) Keep at rolling boil for about 1 minute, then shut off the burner.


Ladle the glaze into jars and cover with lids and rings. Leave about 1/4 inch of head space.


Process for 5 minutes in water bath canner and POOF!!!!...Magic Mistake.
If you want to mess this all up and do it RIGHT, you could always use real sugar instead of splenda, and you will get apple JELLY instead of glaze.......but what fun is that?

My mother wants to heat up some of the glaze and drizzle it over ice cream.  Can't say that would be a bad idea at all.....Mmmm!


Saturday, October 5, 2013

Raising Chickens is Easy

Raising chickens isn't rocket science. We have come to find that chickens are one of the simplest additions to a homestead that one could ask for.
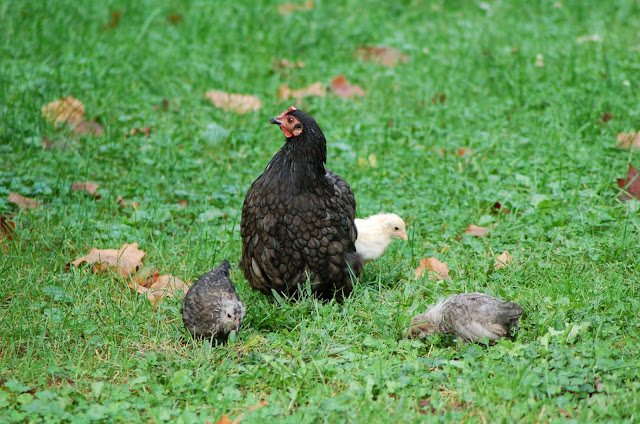
 Now I know I am going to catch a bunch of flack from some show chicken  enthusiasts about how "difficult" it is to raise good chickens. "They need constant attention to their diet". "You gotta make sure they have free choice, crushed oyster shells, fresh water, scratch grains, and de-wormer." "You can't feed cracked corn on tuesdays." "Make sure you shampoo their feathers twice a month." "You can't let the mothers hatch the eggs, you have to take them away and use an incubator." "Don't let them go out in the rain." (as if they are gremlins). BLAH BLAH BLAH.....  Ya, there are seriously people who believe that a hen can't do a good enough job raising her own young. Now in their defense, some breeds of chickens are developed as "egg-laying machines", and the trait of broodiness (where they sit on eggs) has been strategically bred out of them. For a homestead, I would suggest getting at least a few chickens (if not the whole flock)from a breed which has retained the broody traits. Our farm has a few feather footed cochin bantams that are absolutely incredible mommas. They will go broody at a moments notice and sit on any eggs she can find. I once had a hen who I placed on 9 aracauna bantam eggs and she hatched all of them. The chicks were sold the next day, and momma immediately sat on more eggs, so I put her on 9 more, and she hatched those too. Sold those chicks the next day also. Can you guess what she did next?  Yup! back on more eggs. This time, I had to actually remove her every day for a week in order to "force" her to begin eating better,since she was beginning to whittle away from the stress of the past 42+ days of incubating. 
Here is the story on how a chicken comes to be. (essentially, the process is mostly the same for all birds, although incubation times are typically different)
A chicken lays one egg every 25 hrs....ish, and they only lay when it is light. She will lay the eggs in the same location every day until the day where "her schedule" meets the darkness. This is when she will sit on the eggs and remain on them. This pile of eggs is called a "clutch" Up to this point, she doesn't actually sit on them. For the chicks inside to actually begin forming,  the eggs must reach 99.5 degrees F for 24 hrs. (this is the reason all of the eggs typically hatch at the same time.) Momma hen will remain on the eggs, with occasional quick trips to water and feed, until the eggs hatch. Chicken eggs take 21 days, but she doesn't know this. I have had some hatch in as few as 18 days, and some take as long as 23. Just before the chick hatches, it absorbs the yolk, which will allow it to stay alive for up to 3 days without food or water. They will have to stay with the hen for at least 5 weeks to regulate their body temperature by tucking into momma's feathers. Once they have their own feathers to keep warm, they are pretty much on their own and even their own mother will begin using the "pecking order" with them.


All of our eggs are fertile, though you wouldn't know it. When we crack open an egg, it appears to have the same components as the ones you buy in the grocery store. The difference?  Farm raised eggs have MUCH better flavor, Darker, richer yolks, and typically harder shells. The color of the shell really doesn't make a difference to the inside. As you can see, we have quite the variety. Greens, Blues, Browns, Whites...! 

Chickens don't need high priced hotels to live in. My favorite reference to this was when Kate Gosselin decided to save money on eggs for her 8 little monsters by buying chickens. The little Amish dudes came and built that beautiful coop for her. (probably charged her 5 grand) and she ended up hating the fact that she actually had to......what's that word?......oh ya,  "work". Pretty sure the chickens didn't last for even the entire season, did they?.  Money she saved = negative $4,980.
Some people just aren't cut out for homesteading.
Our coop is an old 8x8 shed, with a divider for straw and hay storage. There is a small run attached (with a door cut in the side of the shed to allow 24-7 access to the sun and dirt. Every morning, the run door is opened, allowing full access to the world for the chickens to free range for food. In the evening, after all of the chickens have re-entered the coop for the nightly roost, the door is closed to keep out predators. That's it! Nothin' to it. The chickens pretty much do what they want. 

I used to lose a lot of chickens to hawks, until I discovered the aracauna's. This chicken is like a meerkat. There is always a sentry or two...or four...or six, on point watching for danger. I swear, even if a blackbird flies over, the chickens all beeline to the nearest cover. Prior to the aracauna's, I would lose at least 1 bird every other week. Since I purchased them a year and a half ago......Zero birds lost from ANY predators. The only downfall....these birds do not like to be held and cuddled. Easy trade-off  for me since I am NOT a cuddler.

The aracauna's lay the blue and green eggs.

Our flock, free ranging in the sun.

They love my neighbor's apple trees too. They eat the apples which have dropped down, and all of the bugs which are crawling on them.
Chickens....GET SOME!

Wednesday, October 2, 2013

Rust Stains

Posted by Cris
Laundry is hard enough without having to deal with hard water and rusty pipes.  We have a house filter, and water softener to help with the well water.  We use rust remover salt pellets.  When the water softener is empty, this is what happens. My kids FAVORITE shirts end up with rust stains ALL over them.  

Miranda's shirt After Laundry and with all the Rust spots.  

Mason's shirt After Laundry and with all the Rust spots.

Here is the miracle maker - because Oxiclean, stain removal sticks, gels, etc don't make a dent.
You need Lemon Juice and sunshine.  You squirt on and soak in lemon juice to the affected areas and put in the sunshine to dry - We have clotheslines, but the back porch will work fine too. 


And while it isn't perfect - It's a LOT better and I may try treating the shirts again. 


They are good enough to wear out in public - which is good enough for me!